Connecting MIDI to Hauptwerk™ for Theatre Organs
Hauptwerk™ Theatre Organs without tears
These instructions are intended to help you to exclusively set up Hauptwerk as a single model Theatre Organ. If you also plan to run Hauptwerk as a Classical Organ, you may not wish to make some of the alterations recommended below.
You need to use a very strict methodology for this. There are so many settings that look similar, it is easy for the most intelligent people to become confused. Don't be tempted to 'flit' from one menu to another. It MUST be one step at a time.
You will also find in the following paragraphs that there is a huge amount of reading. It needs to be taken slowly and each stage understood before proceeding. As you progress, you will start to become familiar with the concepts and terminology involved.
MIDI
A few simple words about MIDI.
MIDI is a much misunderstood method of data transmission. For the purposes of Virtual Theatre Organs, most of its use can be condensed into the following:
- Keyboard/keys data - Usually Note-On and Note-Off signals.
- Expression Pedal position data - Usually Continuous Controller signals.
- Stop and switch data - Usually either Note-On and Note-Off signals or Program Change signals.
MIDI data is not error checked. If a signal is sent and subsequently corrupted or missed by the receiving device, it is lost and there is usually no warning issued. It is therefore important to use a good quality MIDI interface - the really cheap ones are not suitable for our purposes. Also, cable lengths should be kept to a minimum and screened cable should be used. Always install the latest drivers for your MIDI interface.
Strange results can occur with MIDI, such as ciphers and switches that won't switch off. These are most often caused by missing or corrupted data.
Always check that your MIDI interface is 100% working correctly before blaming a bad setup.
MIDI interfaces come with one or more twin Ports. Each port is capable of transmission either IN or OUT of the interface, never both on a single port. Ports are normally identified by the 5 pin DIN socket provided to plug in your MIDI capable devices. Each pair of ports is a complete MIDI interface with a unique identifying name associated with each port. For the purposes of this guide, we are only dealing with data in one direction. That is OUT of the console/keyboard/expression pedal etc and IN to the MIDI interface, where the data is processed by your PC and passed on to Hauptwerk. Sometimes data is required OUT of the PC to be handled by another device. That requirement is not catered for by this guide at this time.
Each Port is usually capable of supporting a maximum of 16 Channels.
Channels are capable of supporting up to 256 individual Notes. They can also carry Continuous Controller data and Program Changeinformation.
A Note can be viewed as an individual Switch which is only ever in one of two states - either ON or OFF and is used to convey data to many devices, not just musical notes/keyboard presses. ON can be thought of as having a value of 1 and OFF can be thought of having a value of 0
Continuous Controller data consists of values of 0 to 127 which may be changed in real time. These will often be used to convey the position of an expression/crescendo pedal and for utility sliders.
Program Change information is sometimes used to change the state of virtual stops and pistons. It conveys CHANGE information , each time a physical switch is used. For each Program Change message sent from the SAME device, the SAME data is sent. Hauptwerk is then setup to handle each occurence as a CHANGE (toggle) from ON (1) to OFF (0) and OFF (0) to ON (1).
For the purposes of Virtual Theatre Organs and Hauptwerk, we can view MIDI as being a 16 lane highway, with barriers between the lanes, and different style vehicles, each carrying different types of load.
Having setup (or purchased already setup) a physical console for MIDI, It is now our mission to define the MIDI data that arrives from our console to Hauptwerk via Hauptwerk's General settings menus and route it to our chosen Theatre Organ using menus in Hauptwerk's Organ settings.
Setting up
Firstly, you need to verify data for your physical devices - pedals, manuals, stops etc. Don't try to do it from memory or guesswork. There are so many parameters where a mistake will completely throw you, that you need to be certain of your information. With every respect to you, the reader, don't assume that because x or y organ does it this way, that Hauptwerk will. Methods very rarely correspond.
Some information may be contained in a manual for your devices but if you really want to be sure, in real time, it will greatly help you to set up a MIDI monitor. This author prefers the Artisan MIDI monitor which is available (free) from Artisan Instruments www.artisaninstruments.com and is designed around use of their uMIDI system. It has the advantage of being OS independent on Windows systems.
There are other MIDI monitors available. If you have a favourite that you are used to, please use that.
For the purposes of this setup, we will assume that you are using a single MIDI device to interface to your PC. This will have one MIDI INPUT PORT and 16 channels. It may also have one MIDI OUTPUT PORT, which you can ignore. If you have a device with more than one MIDI INPUT PORT, you should use only one of them and make a note of its name. It is beyond the scope of this article to cater for setups that require more than one MIDI INPUT PORT.
Open a spreadsheet, then you can cross-reference.
We will assign Theatre Organ names to everything.
Firstly make a list of the MIDI channels that your input devices use. Keyboards will be an obvious candidate, followed by expression pedal/s, then maybe stops and other switches.
You will possibly end up with categories for:
- Pedal (In)
- Accomp (In)
- Great (In)
- Solo (In)
- Acc 2nd Touch (In)
- Expressions & controllers
- Pedal stops
- Accomp stops
- Great stops
- Solo stops
- Acc 2nd Touch stops
- Tremulants and switches
that makes 12 occupied MIDI channels, leaving 4 spare which could be used for keyboard MIDI outputs. Assign a MIDI channel of choice to EACH category, according to the settings for your physical devices.
Now you can start setting Hauptwerk:
Click General settings and select MIDI input paths. <CTRL- 9> is a keyboard shortcut.
In the left hand pane you will see a list of MIDI interface entries. At this point, if you want to avoid confusion, you could delete all of the entries and start again. If you prefer, simply overwrite the existing names to something that makes total sense to you. It does not matter what the default name is. You can overwrite any default with anything you want, because you will end up with a unique set of (Theatre) names with the correct MIDI channel set against each one, which you will have entered by hand.
The first entry can have its Alias (RH pane) set to 'Pedals (In)' and it's MIDI channel set to the one that is correct for your MIDI pedalboard. The next channel would be 'Accomp (In)' and so-on.
Just enter the name for each into the Alias panel, and set the MIDI channel by either clicking on the Up/Dowm arrows or entering the number by hand.
Leave the Key Shift setting at 0.
For manuals and pedalboard leave the Transposer checkbox checked. For all other entries uncheck the Transposer checkbox.
Whilst you are entering keyboard details, you should also enter MIDI channels for you pistons/stops/couplers/tremulants/other switches groups. Stops and couplers will often share a group, provided that there are no more than 256 individual note numbers per group, for note events.
You should end up with a list similar to the one shown here:
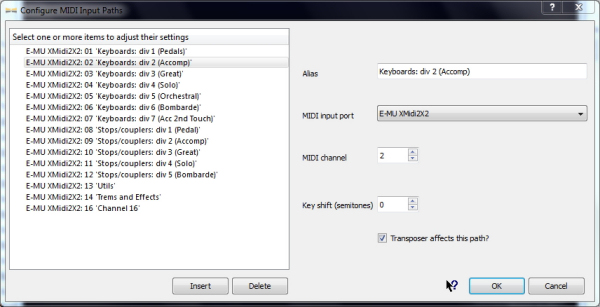
Always delete unwanted entries, you can always Insert extra entries if you need to.
Click OK when done.
The next stage is to set the Keyboard MIDI inputs for the keyboards you will use.
Click General settings and select Keyboard MIDI inputs.
Once again you will be presented with a list of settings. As before, you can delete the defaults if you want, or just add to the list with your own names, by clicking Insert.
Again choose a sensible name for your keyboards and enter into the RH Name panel.
Set the chosen MIDI Input port/channel against each keyboard by using the RH dropdown. This should now be easy because you can simply match the name of the keyboard against the name you put against the MIDI port/channel in the previous MIDI input paths listing.
Set the number of keys - 61 for manuals, 32 or 30 (usually) for pedals.
DO NOT change the Note number of first key - leave at 36 for all entries.
Leave the Normal: note on/off, any velocity setting for all entries.
Set Default organ keyboard to None, using the RH dropdown. This will save confusion later.
You should end up with a list similar to the one shown.
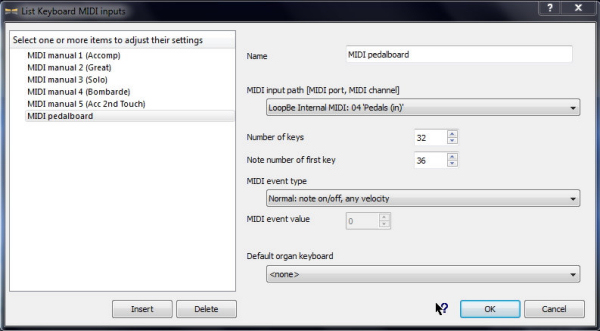
Click OK when finished.
Let's test out what we've done and give ourselves some encouragement.
Load your favourite organ into Hauptwerk. I'm using the Paramount 320 as an example (well I would, wouldn't I?)
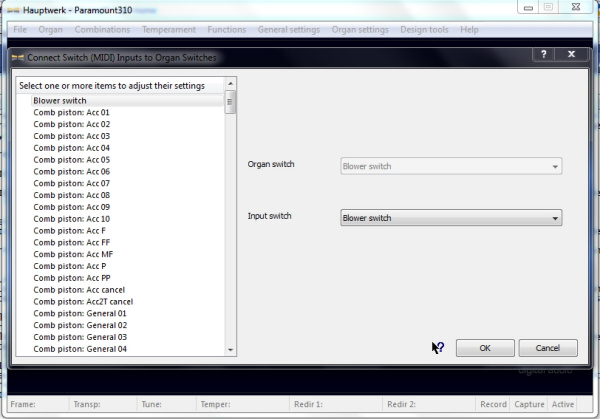
Click Organ settings and select Connect keyboard MIDI inputs to organ keyboards.
This will bring up a menu screen like this one:

All you have to do here is to match the names.
Highlight each organ keyboard where you have a corresponding physical keyboard and select the physical keyboard from the drop-down on the right. In this example you are simply matching Accomp to Accomp. It really IS that easy.
Click OK when done.
Before testing what you have achieved so far, firstly ensure that you are able to hear some sounds. Set some stops on by using your mouse, then go to the organ's console view (if it has one) and click on some keys for that division, to ensure that you have audio output. If this stage doesn't work, figure out why and rectify it before proceeding with further settings tests.
You can hear some output? Good! Now try playing your physical keyboard for the same division and you should hear sounds. If you don't, check to see if the virtual keys move on the screen when you press physical keys. If the keys are moving but no sounds come forth, then it's likely that either you have the wrong (or no) stops selected for the keyboard division, or you have connected the wrong organ keyboard to a physical keyboard. You really must get this stage right before proceeding, or confusion is likely to reign supreme. Slowly retrace steps from the beginning and you will eventually find the problem.
Once your keyboards are working in the right order, you can move on to setting up expression pedals.
This is going to be fun - Yes it IS!
You should have already set the MIDI Input Path for Expressions & controllers in the initial stages. If you didn't, you'll need to make those entries using the instructions above, that you used for keyboards.
Next, click General settings and select Continuous Control MIDI Inputs.
You will now see a table similar to this one, except that the names on the left will probably be classical defaults and will need to be altered to suit Theatre controls.
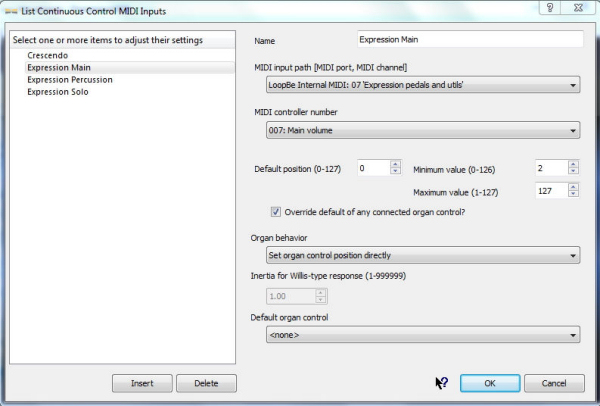
Once again, change each entry by highlighting it on the left and overwriting it in the RH Name panel to suit your physical pedals. Delete unwanted entries.
As you highlight and change each LH entry, you can change the parameters associated with it at the same time. You will need to set the MIDI input path for each pedal entry and set its MIDI controller number. The MIDI controller number is the Continuous Controller number that each pedal exclusively transmits data on and can be found either from the device (expression pedal) manual, or by observation in a MIDI monitor, showing CC (Continuous Control) information. There are other settings which will require attention:
The Default Position will be 0 for Theatre Organs. i.e. The swell shades will be closed at start-up. The Minimum Value requires a little thought. For Crescendo pedals and often other expression pedals, I tend to set this value to 5. The reason is that there is inherent 'play' in linkages on pedals and they don't always return completely to zero. Often sitting just above the zero line at level 1 or 2. This can lead to false positives where the Crescendo may have its stage 1 or 2 permanently set on. With expressions, the shades may never quite close 100%.
The maximum value can be left at 127 for now. It can be fine-tuned later if necessary. The "Override default of any connected organ control" should have its check-box ticked and the Organ behaviour should be "Set organ control position directly", unless you are into calculating spring pressure and shade oscillation for a Willis style setup. Lastly set Default organ control to "None".
Click OK when finished.
The last part of the Continuous Control/Expression Pedals setup is really very easy.
Click Organ settings and select Connect Continuous Control MIDI Inputs to Organ Continuous Controls.
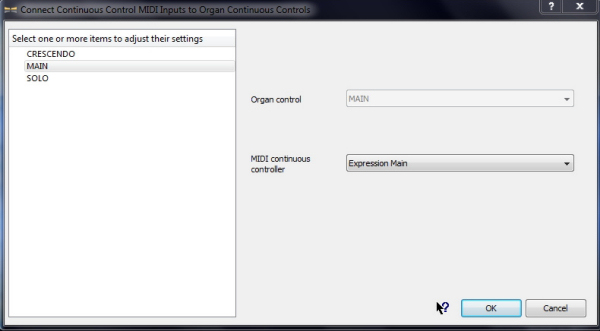
As you can see, there are only a few settings to deal with and the task is simply to match the pedal on the left to the MIDI Continuous Controller name on the right, using the drop-down. Setting up the CC name as something you recognise, really does pay off.
Click OK when finished.
Select Console view for the organ and you should now see the virtual expression pedals move when you operate your physical pedals.
The last major part of the setup procedure is involved with all pistons, stops and couplers, and is the most complex looking and the easiest place to get lost. As this is about a single VTPO installation, you will know exactly what you're dealing with and can make accurate lists. The simplest way to make a suitable list is to use a spreadsheet and work backwards. If you click Organ settings and select Connect switch MIDI inputs to organ switches ... On the left side you will see a list of all pistons, stops, couplers, tremulants and other buttons and switches that have been provided in the sample set, as in the example below. If an item is not listed, it is not available. It is now a simple matter to copy each entry into your spreadsheet. You can ignore the RH drop-down at this stage. Once complete, click Cancel. We will return to this menu after completing the next stage.
You should now make a list of all of your physical organ console stops and switches that coincide with the ones in your chosen sample set. Against each entry you will need to know the note or event number that will be transmitted by each one of them. This information can usually be obtained from the manual for your physical devices, or if that's not too clear, run the MIDI monitor again, actuate each piston/tab/switch/etc, one at a time and observe and list what it is doing in the monitor. The monitor is usually the best way of gathering information because it will be 100% accurate. Occasionally there are misprints in manuals, which can lead to total confusion and make you doubt your sanity!!
At the start of this setup, you should have already entered the MIDI input paths for your stop/coupler/etc groups. If not, you need to do that now (refer to the start of this article).
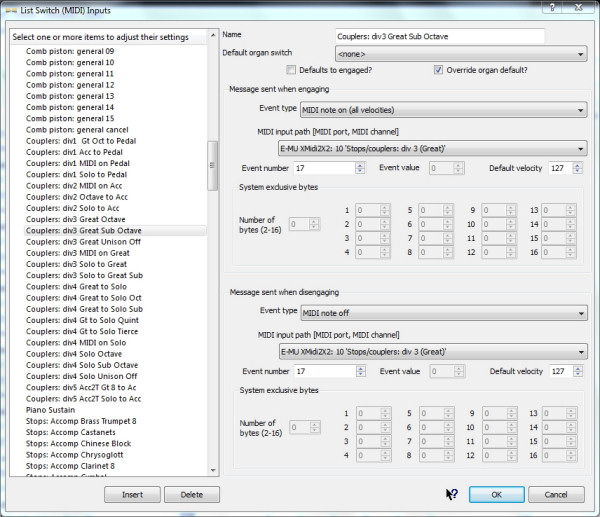
When you have all of the relevant information to hand, Click General settings and select Switch (MIDI) inputs.
Firstly you will see a list of combination pistons, usually followed by a rather daunting list of stops etc, all with classical or divisional names. Don't let them concern you as you they can all be changed to anything you want.
Start with the combination pistons by highlighting the first entry. Change its name to what makes sense to you. The following screenshot may help you. As you can see, the number of pedal pistons has already been reduced from the default, as we only need five for this organ.
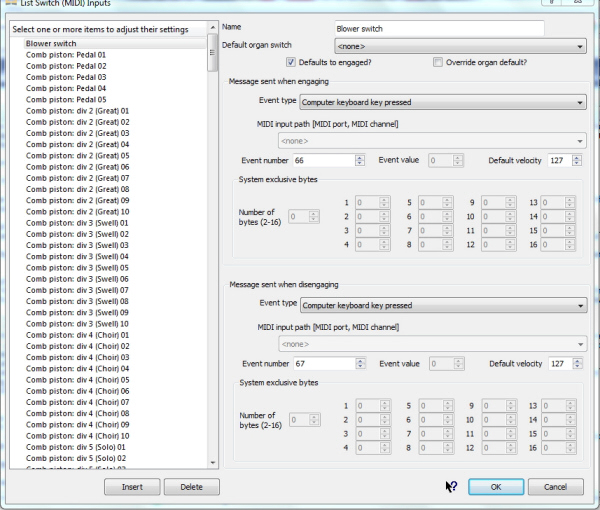
Do not be concerned with the name that occupied the entry by default. For instance you can overwrite a Great piston name with a Solo piston name, or a Swell name with a pedal name etc etc. What you are doing is to name a device and assign its exclusive event parameters to it.
As a trivial example, your first entry could read "My piston 1" and the note numbers associated with it could be "1". If "1" on that entry happens to coincide with the number transmitted by your (say) first pedal piston, then whatever organ piston/switch/etc you have connected to "My piston 1" (in the last part of this setup) will be actuated. Hauptwerk does not care what you decided to name it, as long as the name's not more than 32 characters/spaces long.
As you name each piston, you need to set the parameters for the Message sent when engaging and disengaging settings.
For this, you will need to know what data your pistons are sending. It will usually be either note-on/note-off messages or Program Control messages. Others are possible, but we will concentrate on these two most common types.
Both types will need the MIDI channel and port to be set. This will correspond to the MIDI input path that you previously set for pistons. Use the MIDI input path drop-down to set the path for each piston.
Next click the "Event type" drop-down on the right and set it to the event type for your device. i.e Note on - all velocities or MIDI Program Change.
Now, set the "Event number" for your device. Depending on which event type you use, some other parameters will be greyed out. For now, those that aren't greyed out are best left at default.
You now need to set the "Message sent when disengaging" settings.
If you are using the note-on/note-off convention then you will need to set the MIDI channel and port.
DO NOT MISS THIS SETTING or you will get results that you did not expect. It is usual to set the MIDI channel and port to the same one you used for the "Message sent when engaging" setting.
If you are using Progam Change then this option will not be available. It is also usual to set the MIDI note number the same for engaging and disengaging events. Be careful not to miss these stages.
For Program Change messages the disengaging "Event type" drop-down should be set to "None (engaging event toggles/pulses organ switch)".
That is the only setting needed, the others will be greyed out.
Repeat the above for each piston, then Click OK when done.
Now you simply connect an organ piston to each of your physical pistons by name entry.
Click Organ settings and select Connect switch (MIDI) inputs to organ switches. From the list on the left, select (highlight) the first organ piston that you want to connect. Use the drop-down on the right to select the first of your pistons by name.
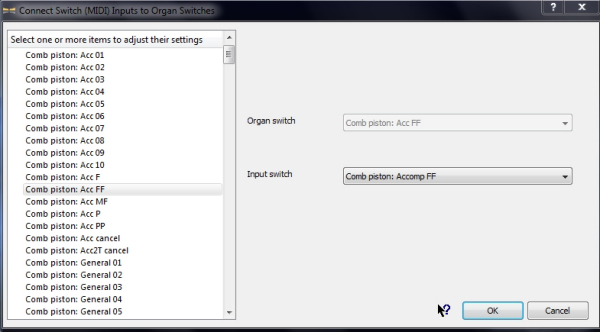
Here you can see that the Accompaniment FF ORGAN piston is connected to the Accomp FF PHYSICAL piston that you previously defined.
Repeat for each piston and Click OK when you're done.
The next stage in this mammoth setup is to configure stops and couplers. There will be many entries, so this will be labour intensive.
Just as you did with pistons, Click General settings and select Switch MIDI inputs ...
This is a default screen that you'll probably be presented with, first time round:
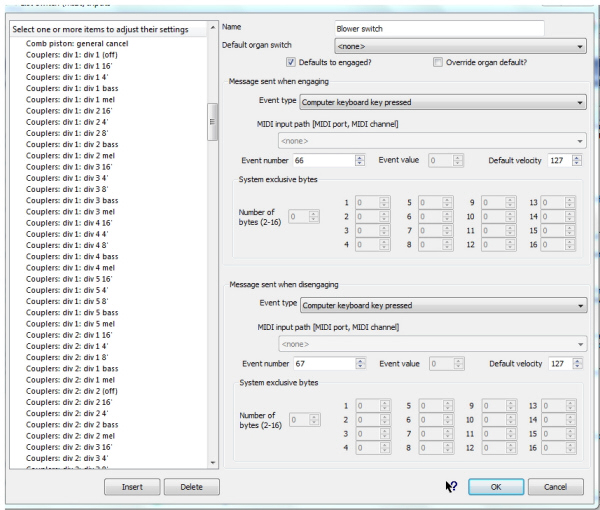
The method for these settings is exactly the same as it is for pistons. You can TOTALLY IGNORE the names and division conventions that may already be present. If you want to overwrite the existing Great division names with those for the Pedal division, go right ahead, it will make absolutely no difference to Hauptwerk. However, it will probably be easier if you keep your entries in blocks of divisions and use a division number for all stops/couplers in the block.
As you can see here, coupler names are the same as the real couplers on the organ.
What you should be aware of is that if you leave the list and return to display it later, Hauptwerk will display it alphabetically. It will pay you to use a naming convention that always starts the same way for each division. Also, because Hauptwerk orders numerically as well, it's a good idea to use a leading zero on all single numbers.
An example is something like "Stops: Pedal: name of stop" so that Hauptwerk will sort on "Stops: Pedal:" for all of the pedal division and very often the stop name will then appear alphabetically within its division group.
Again here, the stop names are the same as on the actual organ we're configuring.
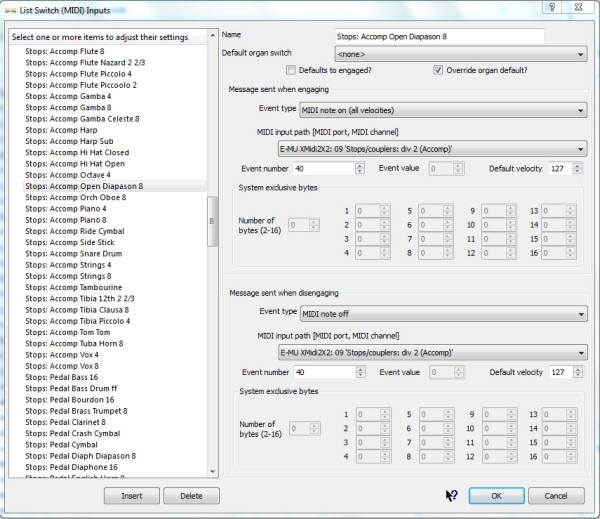
Now you can easily take the name of each stop from the list that you made for the organ and enter it into the table, then enter the appropriate parameters, just as you did for pistons. Mostly for stops and couplers the Note-on/Note-off convention will be used, so don't forget to set the MIDI path for both events. i.e. Engaging and disengaging. Of course it is quite permssible to use Program Change or other conventions if that's what your setup dictates.
Tremulants and Re-Its are entered in exactly the same way, using actual tremulant names associated with their ranks.
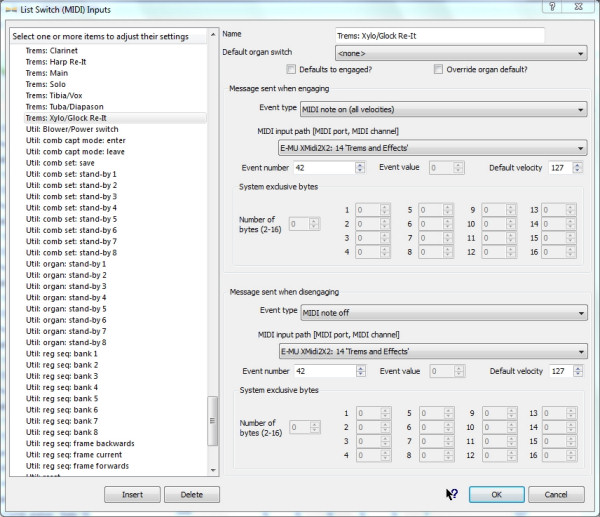
Lastly you may wish to connect other switches and levers etc. to organ switches and levers. From the example above, you can see the entry "Util:Blower/Power switch. This is entered the same way as for all other entries. Levers and other switches would also have entries in a similar fashion.
You can also see in the list above, various utility functions. These should not be deleted, but it is a good idea for the functions that you intend not to use, to set the Event MIDI numbers to something well out of the normal ranges that you will be using, . That way, you won't send an unknown MIDI event one day and wonder why something unexpected changed. Finally, click OK when you're finished.
Now it's time to complete the last part and link everything together.
Click Organ settings and select Connect switch MIDI inputs to organ switches ...
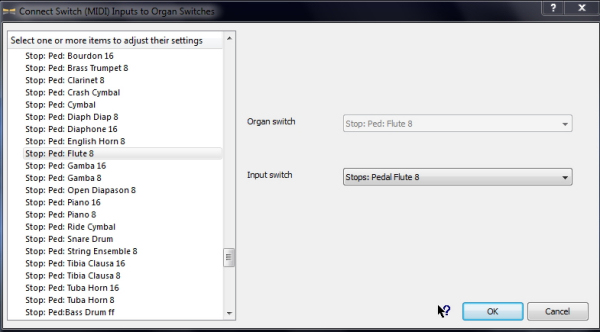
You can now connect all couplers, stops and switches that the sample set provides to your newly defined MIDI switches, simply matching name for name. As in the example above, the Pedal Flute 8' stop on the organ is connected to the MIDI switch Pedal Flute 8 that was defined for it. EVERY other switch can be connected in this way - just match like for like.
Once again, click OK when you're finished.
Finale
It's now time to test everything. Firstly check that every key on every manual and the pedals are seeing a response from Hauptwerk. Either set a stop on for each division (BY HAND with your mouse) and listen for each key press, or view the console screen keys, if they are present.
Once you have established that keyboards are OK, you can progress to checking ALL stops in all divisions. If you find that one doesn't work OR if you have two or more organ stops responding to a single physical stop, or the wrong stop on the organ is responding to a console stop, note them down and continue checking all other stops.
For any stops that are incorrect, you can now work backwards through the connections, using the same methods that you used to define them.
Also at this point, if you have a stop that turns on but will not turn off, you can check the event settings here:
Start at Organ settings/Connect switch MIDI inputs to organ switches ... and for every stop in error, check that you have the correct matching names for the Organ and MIDI stops. If they are OK, then you can go back to General settings/Switch MIDI inputs and check that you have the correct parameters set. It only takes ONE incorrect parameter for things not to work!
I make regular settings backups as I progress. Even if you don't do that you MUST make a final backup - you really don't want to lose all that hard work by making a single mistake!!!
Click File and Select Backup your current Haptwerk settings and personal data. Always use an exclusive filename and preferably one that you can return to and know what it's for!
That's it - you should now be ready to play.